
Devora adds an approval and control layer to “login as user”. A team member requests access to one customer’s account with a reason, a scope and a duration. An approver or admin approves it. Your own app then signs them in as that customer, behind a visible banner and a backend guard. When the session ends, Devora tells your backend to revoke it and keeps the record.
This walkthrough follows a single request from start to finish, as an evaluator would see it. It covers what you connect, what each person does in the dashboard, what your app enforces, and what’s left in the access history afterwards. If you’re new to the idea, start with what user impersonation is, and keep the user impersonation glossary open for terms like actor and subject.
What does Devora do, and what stays in your app?
Devora runs the workflow around a session. Your application still owns the session itself. Devora’s auth provider guide (opens in a new tab) puts it plainly: Devora authorizes and tracks impersonation, and your authentication provider still creates the browser session.
| Step | What Devora does | What your application does |
|---|---|---|
| Find the customer | Shows search results in the dashboard | Answers the search from your own user store |
| Approve | Records the request, reason, scope, duration and approver | No code needed |
| Sign in | Asks your backend for a credential and hands it to the agent’s browser | Creates a short-lived credential with your auth provider |
| Enforce | Holds the endpoint rules and supplies the backend guard | Wraps your routes with the guard and passes it verified context |
| End | Sends a signed terminate request | Revokes the credential |
| Record | Keeps access history and, if enabled, a recording | Records business events in your own audit log |
Your app also keeps tenant authorization. An impersonated session still goes through the customer’s normal permission checks.
How do you connect your app to Devora?
You connect your app by mounting Devora’s backend SDK, which answers three signed requests, and adding the frontend SDK to your app. The backend integration guide (opens in a new tab) defines the route contract, relative to a mount path you choose:
| Handler | Request | Your handler returns |
|---|---|---|
USER_SEARCH | GET /user/search?term=&limit= | Matching users: ID, plus optional name, email, avatar and display attributes |
IMPERSONATE | POST /impersonate/:id | A short-lived token for the selected user, and optionally a redirectUrl |
TERMINATE | DELETE /impersonate/:id/terminate | { success: true } once the session is revoked |
The SDK also adds signed /test and /health routes. Every request from Devora is signed, and the SDK verifies it and claims its request ID once before your handler runs.
On the frontend, the browser SDK uses a client key. It detects the one-time code in the link Devora gives the agent, retrieves the approved credential and passes it to your onImpersonate callback. Backend SDKs cover Express, Fastify, Hono and Next.js on Node, and Django and FastAPI on Python. Frontend packages cover React, Vue, Svelte, Solid and plain JavaScript.
The dashboard side takes a few minutes. The dashboard and keys guide (opens in a new tab) walks through it:
- Copy the organization ID from Settings → General.
- Create a server key and a client key under Developer → API keys.
- Under Developer → Integration, set the customer backend URL, the frontend URL, the SDK mount path and the allowed origins for client keys.
- Select Test connection, which sends a signed request to your
/healthroute.
How your backend creates the credential depends on your auth provider. Clerk is supported through actor tokens and ticket sign-in. Better Auth is supported with prerequisites, using a binding route you write. Auth0 is an advanced route through Custom Token Exchange, WorkOS AuthKit needs a limited app-owned bridge, and custom JWT or cookie sessions use a one-time handoff credential. For one provider in depth, see Clerk user impersonation for customer support.
How does a team member request and get approval?
A team member submits a request, and nothing opens in your app until it’s approved.
A team member requests access
A request starts with a search. On Requests → New request, the team member types a name, email or user ID into the customer search box. Devora sends that term to your USER_SEARCH handler and shows what comes back. An administrator chooses which fields each result displays under Developer → Integration → Search results, as the overview for teams (opens in a new tab) describes.
Then they fill in the request:
- Access: Read-only or Read & write.
- Duration: how long the session may last once it starts.
- Reason: why they need to open this account, for example the ticket they’re working.
Devora keeps an encrypted snapshot of the search result for the chosen customer, so the approver and the audit trail see the same user the requester saw. The search results guide (opens in a new tab) covers what that snapshot contains.
An approver or admin decides
An approval is someone in your organization, usually a second person, agreeing that this access is justified. Requests go to an administrator or a designated team approver, who reviews the customer, reason, scope and duration, then approves or rejects. Pending requests appear in the review queue on the dashboard home page.
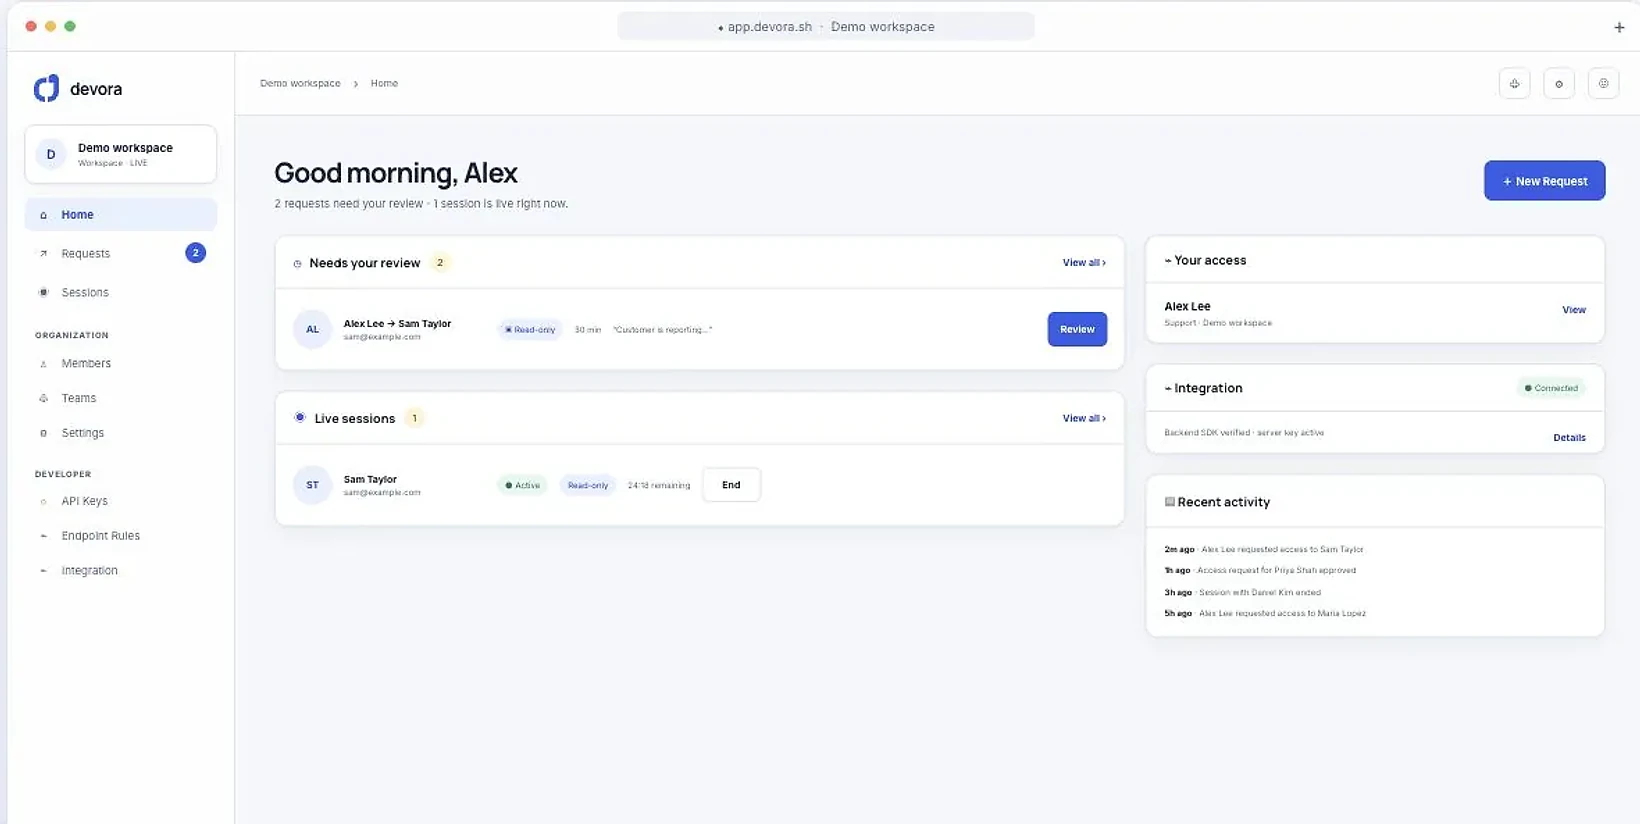
Administrators can approve their own requests unless Allow administrators to approve their own requests is turned off under Settings → General. When they do, Devora records the approval as self-approved, and the testing guide (opens in a new tab) includes a check that the audit trail shows it. That keeps small teams moving without hiding who approved what.
Approvals are internal to your team today. A step that sends the request to the customer after internal approval, with the session starting only once the customer approves, is on the roadmap.
What happens when the session starts in your app?
Once a request is approved, the requester selects Start session. Devora calls your IMPERSONATE handler with a verified context: the Devora session ID, scope, expiry, the acting staff member (the actor) and the customer (the subject). Your handler creates a short-lived credential for that customer and stores the context with it, for example as a claim in the session token. The credential should expire no later than the Devora session.
Devora then gives the agent a one-time link to your app. The session lifecycle guide (opens in a new tab) notes it’s valid for two minutes. The link opens your app in a new tab, where the frontend SDK redeems it and calls onImpersonate, and your app signs the agent in as the customer.
The agent now sees a banner. According to the frontend integration guide (opens in a new tab), the default banner shows who’s viewing, the scope and a live countdown, with an End session control. Reloads and new tabs need a small session bridge route, so a second tab doesn’t run as the customer without the banner and Devora’s controls.
How does the backend guard enforce scope?
The backend guard is the part of Devora’s SDK that checks every impersonated request against the session’s scope and your endpoint rules. Devora’s scope and security guide (opens in a new tab) sets the defaults:
| Scope | Default behavior |
|---|---|
| Read | GET, HEAD and OPTIONS are allowed. Write methods are blocked unless a read-only exception allows them |
| Write | Requests are allowed unless an always-blocked rule matches |
You manage both lists under Developer → Endpoint rules. Always-blocked rules apply in both scopes and suit routes like password changes, billing, API keys and role changes. Read-only exceptions cover writes that change nothing important, such as marking a notification as read.
There are three layers: UI guards, the browser SDK blocking disallowed fetch and XHR calls, and the backend guard. Only the backend guard is a security boundary. It reads the Devora context from your verified session or token, never from headers the browser sends. It rejects expired context, checks with Devora that the session is still live, and fails closed if it has no policy. Read-only user impersonation explains what else your backend should block, such as GET routes with side effects.
How does a session end?
A session ends in Devora first, and then Devora tells your app. These are the common ways:
| How it ends | Who or what ends it | Reason your backend receives |
|---|---|---|
| Agent ends it | End session in the banner, or the dashboard | user_ended |
| Admin terminates it | An administrator on the session page | admin_terminated |
| Approval revoked | An administrator revokes the request | request_revoked |
| Time runs out | The approved window ends, or the session is idle (15 minutes by default) | time_limit |
| Link never opened | Nobody used the one-time link | not_started |
Account events, such as removing the agent from the organization, end sessions too.
For each ending, Devora sends DELETE {mount path}/impersonate/:id/terminate to your backend. The session lifecycle guide (opens in a new tab) explains why this is the call to rely on: it’s signed, sent even when no tab is open, and retried if delivery fails, with up to 5 attempts within 6 hours. Your handler records the Devora session ID as revoked, revokes the provider session where it can, and returns { success: true }, including on a repeat. If delivery never succeeds, the session page says Your application was not told this session ended and an administrator can select Retry notice.
In the open tab, the frontend SDK calls onSessionEnd, where your app clears the impersonated login and returns to a safe page.
What does the access history show?
The access history answers who opened which customer account, when, why and with whose approval. Open Sessions → History to list past sessions by agent, customer, access and outcome. Each session page shows the reason, who approved it and when, when it started and when it ends, and a timeline. Its security audit records who ended the session and why.
Recording is optional. The recording privacy guide (opens in a new tab) explains that session recording is off by default and an administrator has to turn it on under Settings → Recording. The default profile is fully masked, sensitive fields such as passwords and card numbers stay masked in every profile, and masking happens in the browser before anything leaves the page. A separate activity timeline, also off by default, logs page views and clicks.
Devora’s history covers the access itself. What the agent changed inside your app belongs in your own audit events, with both the agent and the customer recorded.
When is Devora the right fit?
Devora fits when more than a couple of people need to open customer accounts and you want requests, approvals, scoped access and a history without building them yourself. If a few trusted engineers already use your provider’s native impersonation and that meets your policy, you may not need it. Build vs buy user impersonation walks through that decision.
To see the whole flow with your own stack, create a Devora account and try one staging session with a synthetic customer.
Sources
- Devora: Authentication providers (opens in a new tab)
- Devora: Backend integration (opens in a new tab)
- Devora: Dashboard and keys (opens in a new tab)
- Devora: Overview for teams (opens in a new tab)
- Devora: Search results and templates (opens in a new tab)
- Devora: Test the integration (opens in a new tab)
- Devora: Session lifecycle and cleanup (opens in a new tab)
- Devora: Frontend integration (opens in a new tab)
- Devora: Scope and security (opens in a new tab)
- Devora: Recording privacy and activity logs (opens in a new tab)